
Network
Pi-hole Wizard
Set up Pi-hole on your Mac in one click, then follow a short wizard that points your Mac's DNS at it.
- Category
- Network
- Requires
- macOS 13+
- Size
- 714 KB
- Price
- Free
Preview
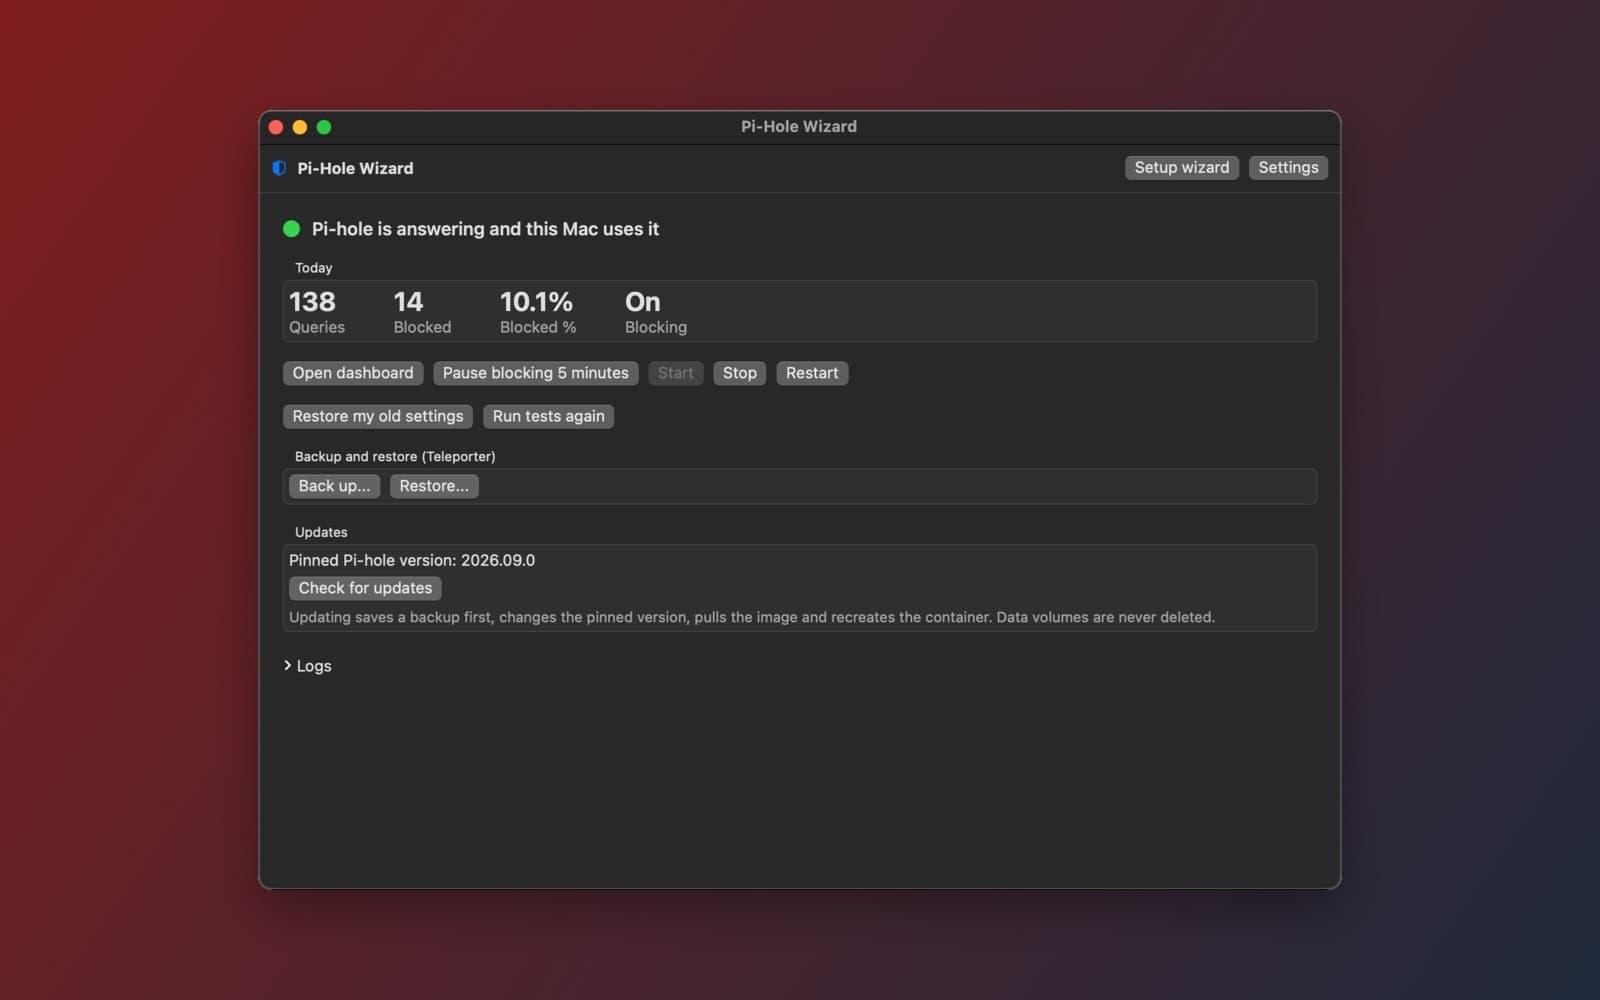
About Pi-hole Wizard
Pi-hole Wizard sets up Pi-hole, the network-wide ad and tracker blocker, on your own Mac without Docker Desktop. It runs Pi-hole in Docker on Colima, then walks you through the few settings that make it work: your Mac's DNS and your browser. Each step has a Test button, so you can see that it works instead of guessing.
What it does
- One-click setup. If Colima and Docker are missing, one button installs them with Homebrew, then starts Pi-hole from a version-pinned container. It never installs Homebrew itself.
- A short wizard. Welcome, check your Mac, install, start Pi-hole, test blocking, set your Mac's DNS, check your browser, done. Each step can be run again.
- DNS, with a way back. It sets Pi-hole as your Mac's first DNS server and 1.1.1.1 as the backup. Your old settings are saved first, and Restore my old settings puts them back.
- Browser check. It looks for a browser's own "secure DNS" setting, which would skip Pi-hole, and shows where to turn it off. It never changes browser settings itself.
- Today at a glance. Queries, blocked, blocked percent and whether blocking is on, in the window and a menu bar icon that shows the state.
- Everyday controls. Open the Pi-hole dashboard, pause blocking for 5 minutes, start, stop or restart, logs, backup and restore with Pi-hole's own Teleporter, and an update check that backs up first.
How it was made
One prompt in the SiliconDevKit desktop app, with no follow-up. The prompt asks the builder to read the Pi-hole documentation, the Pi-hole API, the Colima options and the macOS network commands before it writes code. The cloud wrote the code and a Mac compiled it, and the first build compiled with no fixes.
Notes
You need Homebrew and an internet connection for the first install and image download. The app asks for your Mac's password when it changes DNS. It protects this Mac only, not other devices on your network. With 1.1.1.1 as the backup server, macOS may sometimes use it, so a few ads can get through. The screenshot shows it running on a Mac with Pi-hole answering. We did not test every wizard step, the restore button, the browser checks or backup and restore from a clean Mac.
Information
- Developer
- SiliconDevKit (generated by AI from a prompt)
- Category
- Network
- Compatibility
- macOS 13 or later, Apple silicon, Homebrew. Apple silicon Macs only (M1 or later), not Intel
- Size
- 714 KB (.dmg)
- Latest version
- 1.0
- Price
- Free
- Signing
- Ad-hoc signed, not notarized
The prompt behind it
This app was generated from the prompt below. Paste it into SiliconDevKit to build your own version, then change it however you like.
Build a native Mac menu bar app called Pi-Hole Wizard: a 1-click Pi-hole setup that runs in Docker on Colima (no Docker Desktop), then an ultra-simple step-by-step wizard that ends with Pi-hole running and this Mac using it for DNS (Pi-hole first, 1.1.1.1 as backup). Every step that can be tested has a "Test" button. Nothing is sent to a cloud service. RESEARCH FIRST (WebSearch and WebFetch before any code) Pi-hole 6 changed a lot, so read, not remember: (1) docs.pi-hole.net and the pihole/pihole page on Docker Hub: image name, a specific dated tag to pin (never "latest"), arm64 support, the FTLCONF_* variables (FTLCONF_webserver_api_password, FTLCONF_dns_listeningMode, upstreams), volumes and ports; (2) the Pi-hole v6 API docs (also at /api/docs on a running Pi-hole): POST /api/auth and the session header, GET /api/queries, stats, POST /api/dns/blocking, Teleporter backup; (3) Colima: `colima start --help`, whether UDP port forwarding to the Mac works (DNS needs UDP), whether an app may bind port 53 on 127.0.0.1 without root, `brew services start colima`; (4) man pages for networksetup (-listallnetworkservices, -getdnsservers, -setdnsservers), scutil --dns, dscacheutil -flushcache, killall -HUP mDNSResponder, and running one command with administrator rights from an app (osascript "do shell script ... with administrator privileges"); (5) where Chrome, Edge, Brave (Local State, dns_over_https) and Firefox (prefs.js, network.trr.mode) keep their secure-DNS setting. Where a page disagrees with this prompt, follow the page and say what changed. DOCKER AND COLIMA (honest, never a shell string) - Run tools with Process and an argument array, PATH including /opt/homebrew/bin and /usr/local/bin, a 10 second timeout for quick calls, all off the main thread. Find docker in /opt/homebrew/bin, /usr/local/bin, /Applications/Docker.app/Contents/Resources/bin. - If docker or colima is missing, an "Install Colima and Docker" button runs brew install colima docker, then colima start --cpu 2 --memory 2 --disk 10, streaming output into a log with a progress bar and Cancel. No Homebrew: the button opens https://brew.sh. Never install Homebrew. - Pi-hole runs from a version-pinned compose file in Application Support/Pi-hole Wizard/ (restart: unless-stopped; ports bound to 127.0.0.1 only: 53/tcp, 53/udp, and 8080 to the container's 80; named volumes for /etc/pihole and /etc/dnsmasq.d; upstream DNS 1.1.1.1). If `docker compose` is missing, fall back to `docker run` with container name "pihole". Pull output is streamed with Cancel; docker errors (no network, disk full, port in use) appear in plain words with a Show details box. - Before starting, try to bind UDP and TCP on 127.0.0.1:53 and TCP 8080. If taken, show what holds it (lsof -nP -iUDP:53) and offer another port for 8080 (8081 to 8090). - The admin password goes in the Keychain, never in a file or a command line `ps` can show (use an env-file with permissions 0600). THE WIZARD (one window: steps on the left with check marks, content on the right, Back and Next; each step re-runnable) 1. Welcome: what Pi-hole does (blocks ads and trackers by DNS), what the wizard will do, and that the Mac's network settings change only in step 5, with "Restore my old settings" always available. 2. Check this Mac: Apple silicon, macOS version, Homebrew, docker, colima, ports. Test: run the checks again. 3. Install Colima and Docker: the button above. Test: `docker info` succeeds. Switch "Start Colima at login" (default on). 4. Start Pi-hole: ask only for an admin password (suggest a generated one, with Copy). Time zone from TimeZone.current.identifier. Test, three checks shown separately: container running and healthy; http://127.0.0.1:8080/admin answers; `dig @127.0.0.1 example.com` (/usr/bin/dig) returns an answer. If dig fails but the container is healthy, say UDP 53 is probably not reaching the Mac and show the fix from the research. 5. Test blocking: look up a domain the default list blocks and a normal one; show blocked (0.0.0.0 or NXDOMAIN, check which) versus allowed, plus queries and blocked today from the API. Note that the first start downloads block lists, which takes a minute. 6. Point this Mac at Pi-hole: list network services, preselect the one on the default route (others optional), show each one's current DNS ("Automatic" if empty). After a confirmation saying exactly what changes, run one administrator command that sets DNS to 127.0.0.1 then 1.1.1.1 and flushes the cache. First save the old values to dns-backup.json. Test: resolve a domain through the system resolver and check that the query shows in Pi-hole's log; read scutil --dns and warn if another resolver (VPN, router IPv6 DNS, profile) comes first. Say honestly that macOS may sometimes use 1.1.1.1, so a few ads can get through; offer a "Pi-hole only" switch with its warning. 7. Check your browser: detect Safari, Chrome, Edge, Brave, Firefox; read, read-only, whether each has its own secure DNS (DNS over HTTPS) on, which bypasses Pi-hole; Safari gets an iCloud Private Relay hint. Show two lines of click steps and an Open settings button per browser. Never edit browser settings. "Browser test": open a random name like pw-1a2b3c.example.com in the default browser (an error page is expected, say so) and look for it in Pi-hole's query log within 20 seconds. 8. Done: checklist of the last results, "Primary DNS: Pi-hole, backup: 1.1.1.1", Open dashboard, the password with Copy, how to undo. Claim success only if the tests in steps 4 and 6 passed this session. AFTER THE WIZARD - Main window: status, today's queries and blocked percent (API, every 30 seconds), Open dashboard, Pause blocking 5 minutes / Resume, Start/Stop/Restart, Logs (docker logs --tail 300 with Refresh, Follow, Copy, Save), Backup and Restore (Teleporter zip, confirmation first), Check for updates (back up first, change the pinned tag, pull, up -d, never delete volumes), Run tests again. - "Restore my old settings" puts the saved DNS back (administrator prompt). A launch banner offers it, plus "Start Pi-hole now", when DNS points at 127.0.0.1 but Pi-hole does not answer (for example Colima is stopped after a restart). Test this path. - Menu bar icon: green = answering and used by this Mac, orange = answering but not used, red = used but not answering, grey = stopped. Menu: status, Open dashboard, Pause blocking, Start/Stop, Open window, Quit. Do not stop Pi-hole or Colima on quit. - Settings: launch at login (SMAppService.mainApp), ports, Remove Pi-hole (confirmation naming the container and its two volumes; restores saved DNS first). About: this protects this Mac only, not other devices. QUALITY - macOS 13, Swift 5 language mode, SwiftUI with ObservableObject and @Published. Apple frameworks only, no packages, no Xcode project or asset catalog. Modules: DockerCLI, ColimaManager, PiholeController, PiholeAPI, DNSConfigurator, BrowserInspector, PortChecker, one small view per wizard step. Plain http on 127.0.0.1 only. - The code is compiled later on the user's Mac: check every initializer, label and optional, no force-unwraps. Do not fake anything: no pretend progress, counts or success. - In your reply, say what you built, what the lookups changed, and what you could not test (Docker, Colima UDP forwarding, the DNS change and restore, browser checks, the API).
What it cost
Every AI run that made this demo, one per line. Model: Claude Sonnet 5.5. Tokens are shown as (in / out). “In” counts everything the model read, including text it had already seen in the session at a reduced price.
| Initial prompt(933k in / 45k out) | 196 credits | |
| = | Total(933k in / 45k out) | 196 credits |
Credits are what a build uses on your plan. This counts AI usage only: hosting and the Mac that compiled it are not included.
Version tree
Every change to this app is a new version. Use any build as a template to start your own copy from it; forks that their makers shared appear as branches.
Version 1.0Oct 11, 2026
Build a native Mac menu bar app called Pi-Hole Wizard: a 1-click Pi-hole setup that runs in Docker on Colima (no Docker Desktop), then an ultra-simple step-by-step wizard that ends with Pi-hole running and this Mac using it for DNS (Pi-hole first, 1.1.1.1 as backup). Every step that can be tested has a "Test" button. Nothing is sent to a cloud service. RESEARCH FIRST (WebSearch and WebFetch before any code) Pi-hole 6 changed a lot, so read, not remember: (1) docs.pi-hole.net and the pihole/pihole page on Docker Hub: image name, a specific dated tag to pin (never "latest"), arm64 support, the FTLCONF_* variables (FTLCONF_webserver_api_password, FTLCONF_dns_listeningMode, upstreams), volumes and ports; (2) the Pi-hole v6 API docs (also at /api/docs on a running Pi-hole): POST /api/auth and the session header, GET /api/queries, stats, POST /api/dns/blocking, Teleporter backup; (3) Colima: `colima start --help`, whether UDP port forwarding to the Mac works (DNS needs UDP), whether an app may bind port 53 on 127.0.0.1 without root, `brew services start colima`; (4) man pages for networksetup (-listallnetworkservices, -getdnsservers, -setdnsservers), scutil --dns, dscacheutil -flushcache, killall -HUP mDNSResponder, and running one command with administrator rights from an app (osascript "do shell script ... with administrator privileges"); (5) where Chrome, Edge, Brave (Local State, dns_over_https) and Firefox (prefs.js, network.trr.mode) keep their secure-DNS setting. Where a page disagrees with this prompt, follow the page and say what changed. DOCKER AND COLIMA (honest, never a shell string) - Run tools with Process and an argument array, PATH including /opt/homebrew/bin and /usr/local/bin, a 10 second timeout for quick calls, all off the main thread. Find docker in /opt/homebrew/bin, /usr/local/bin, /Applications/Docker.app/Contents/Resources/bin. - If docker or colima is missing, an "Install Colima and Docker" button runs brew install colima docker, then colima start --cpu 2 --memory 2 --disk 10, streaming output into a log with a progress bar and Cancel. No Homebrew: the button opens https://brew.sh. Never install Homebrew. - Pi-hole runs from a version-pinned compose file in Application Support/Pi-hole Wizard/ (restart: unless-stopped; ports bound to 127.0.0.1 only: 53/tcp, 53/udp, and 8080 to the container's 80; named volumes for /etc/pihole and /etc/dnsmasq.d; upstream DNS 1.1.1.1). If `docker compose` is missing, fall back to `docker run` with container name "pihole". Pull output is streamed with Cancel; docker errors (no network, disk full, port in use) appear in plain words with a Show details box. - Before starting, try to bind UDP and TCP on 127.0.0.1:53 and TCP 8080. If taken, show what holds it (lsof -nP -iUDP:53) and offer another port for 8080 (8081 to 8090). - The admin password goes in the Keychain, never in a file or a command line `ps` can show (use an env-file with permissions 0600). THE WIZARD (one window: steps on the left with check marks, content on the right, Back and Next; each step re-runnable) 1. Welcome: what Pi-hole does (blocks ads and trackers by DNS), what the wizard will do, and that the Mac's network settings change only in step 5, with "Restore my old settings" always available. 2. Check this Mac: Apple silicon, macOS version, Homebrew, docker, colima, ports. Test: run the checks again. 3. Install Colima and Docker: the button above. Test: `docker info` succeeds. Switch "Start Colima at login" (default on). 4. Start Pi-hole: ask only for an admin password (suggest a generated one, with Copy). Time zone from TimeZone.current.identifier. Test, three checks shown separately: container running and healthy; http://127.0.0.1:8080/admin answers; `dig @127.0.0.1 example.com` (/usr/bin/dig) returns an answer. If dig fails but the container is healthy, say UDP 53 is probably not reaching the Mac and show the fix from the research. 5. Test blocking: look up a domain the default list blocks and a normal one; show blocked (0.0.0.0 or NXDOMAIN, check which) versus allowed, plus queries and blocked today from the API. Note that the first start downloads block lists, which takes a minute. 6. Point this Mac at Pi-hole: list network services, preselect the one on the default route (others optional), show each one's current DNS ("Automatic" if empty). After a confirmation saying exactly what changes, run one administrator command that sets DNS to 127.0.0.1 then 1.1.1.1 and flushes the cache. First save the old values to dns-backup.json. Test: resolve a domain through the system resolver and check that the query shows in Pi-hole's log; read scutil --dns and warn if another resolver (VPN, router IPv6 DNS, profile) comes first. Say honestly that macOS may sometimes use 1.1.1.1, so a few ads can get through; offer a "Pi-hole only" switch with its warning. 7. Check your browser: detect Safari, Chrome, Edge, Brave, Firefox; read, read-only, whether each has its own secure DNS (DNS over HTTPS) on, which bypasses Pi-hole; Safari gets an iCloud Private Relay hint. Show two lines of click steps and an Open settings button per browser. Never edit browser settings. "Browser test": open a random name like pw-1a2b3c.example.com in the default browser (an error page is expected, say so) and look for it in Pi-hole's query log within 20 seconds. 8. Done: checklist of the last results, "Primary DNS: Pi-hole, backup: 1.1.1.1", Open dashboard, the password with Copy, how to undo. Claim success only if the tests in steps 4 and 6 passed this session. AFTER THE WIZARD - Main window: status, today's queries and blocked percent (API, every 30 seconds), Open dashboard, Pause blocking 5 minutes / Resume, Start/Stop/Restart, Logs (docker logs --tail 300 with Refresh, Follow, Copy, Save), Backup and Restore (Teleporter zip, confirmation first), Check for updates (back up first, change the pinned tag, pull, up -d, never delete volumes), Run tests again. - "Restore my old settings" puts the saved DNS back (administrator prompt). A launch banner offers it, plus "Start Pi-hole now", when DNS points at 127.0.0.1 but Pi-hole does not answer (for example Colima is stopped after a restart). Test this path. - Menu bar icon: green = answering and used by this Mac, orange = answering but not used, red = used but not answering, grey = stopped. Menu: status, Open dashboard, Pause blocking, Start/Stop, Open window, Quit. Do not stop Pi-hole or Colima on quit. - Settings: launch at login (SMAppService.mainApp), ports, Remove Pi-hole (confirmation naming the container and its two volumes; restores saved DNS first). About: this protects this Mac only, not other devices. QUALITY - macOS 13, Swift 5 language mode, SwiftUI with ObservableObject and @Published. Apple frameworks only, no packages, no Xcode project or asset catalog. Modules: DockerCLI, ColimaManager, PiholeController, PiholeAPI, DNSConfigurator, BrowserInspector, PortChecker, one small view per wizard step. Plain http on 127.0.0.1 only. - The code is compiled later on the user's Mac: check every initializer, label and optional, no force-unwraps. Do not fake anything: no pretend progress, counts or success. - In your reply, say what you built, what the lookups changed, and what you could not test (Docker, Colima UDP forwarding, the DNS change and restore, browser checks, the API).
One-click Pi-hole in Docker on Colima, with a step-by-step wizard that points this Mac's DNS at it.
Opening it for the first time
- Open the .dmg and drag Pi-hole Wizard onto the Applications folder.
- Open it from Applications. macOS may say it can’t check the app for malicious software. Click Done.
- Open System Settings → Privacy & Security and click Open Anyway. This is needed once. Why this happens. To share an app without the warning, see how to notarize it.
You might also like
 Get
GetPlayTube
Paste a video link and watch it in a clean player, with no ads.
 Get
GetAdMute
Listens to your Mac's audio and mutes the ads, then brings the sound back.
 Get
GetToob-Downer
Paste a video link and save the video to your Mac, with a queue to keep track.
 Get
GetAgent Swarm
Send one task to Claude, Gemini and Hermes at once.