
Media
Instant Screen Recorder
A menu bar screen recorder. Drag a rectangle, press Record, press Stop.
- Category
- Media
- Requires
- macOS 13+
- Size
- 0.4 MB
- Price
- Free
Preview
About Instant Screen Recorder
Instant Screen Recorder lives in the menu bar. Click its icon, choose Start Recording, and drag a rectangle over the part of the screen you want. Press Record to start and Stop to finish. The video is saved as an .mp4 in your Movies folder.
What it does
- Pick an area. The cursor becomes a crosshair, and the rectangle shows its size in pixels in large, high-contrast numbers while you drag. You can move or resize it before you record.
- Size presets. Five buttons set the rectangle to common video sizes, such as 1920 by 1080 and 1280 by 720, and a swap button turns a wide size into a tall one.
- Record and stop. The menu bar icon shows a red dot and the time while recording, and Stop finishes the file.
- Optional extras. A short countdown, the frame rate, whether to show the cursor, and system sound.
How it was made
One prompt in the SiliconDevKit desktop app. The prompt asks the builder to read Apple's ScreenCaptureKit and AVFoundation documentation before writing code, and it describes the whole flow: the menu, the crosshair selection, the size label, the presets and the stop button. The cloud wrote the code and a Mac compiled it.
Notes
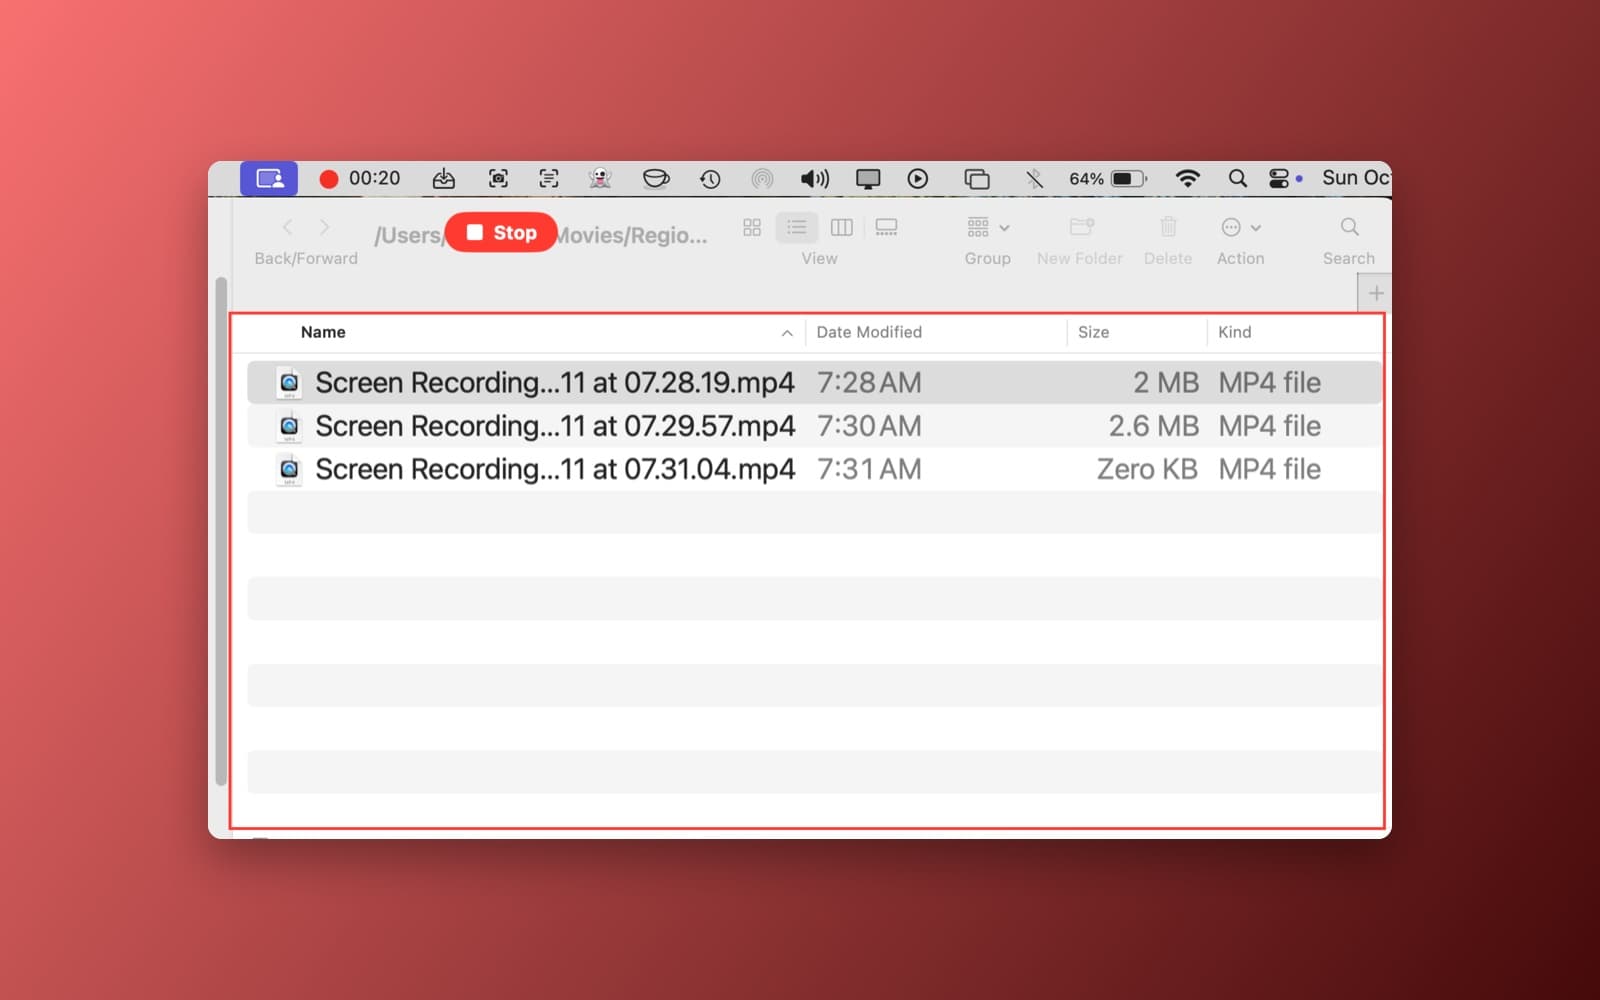
The screenshot shows the app recording a Finder window: the red rectangle, the Stop button and the timer in the menu bar (00:20), with two finished .mp4 files in the folder. We did not test the size presets, the countdown, system sound or recording across two screens. The first time you record, macOS asks for Screen Recording permission, and the app may need to be reopened after you allow it. Part of the file path in the screenshot is hidden.
Information
- Developer
- SiliconDevKit (generated by AI from a prompt)
- Category
- Media
- Compatibility
- macOS 13 or later, Apple silicon. Apple silicon Macs only (M1 or later), not Intel
- Size
- 0.4 MB (.dmg)
- Latest version
- 1.0
- Price
- Free
- Signing
- Ad-hoc signed, not notarized
The prompt behind it
This app was generated from the prompt below. Paste it into SiliconDevKit to build your own version, then change it however you like.
Build a native Mac menu bar app called Instant Screen Recorder: a simple screen recorder that lives only in the menu bar. Click the icon, choose "Start Recording", drag a rectangle on the screen, press Record, and later press Stop. No Dock icon, no main window, nothing else to learn. RESEARCH FIRST (use WebSearch and WebFetch before you write code) Do not rely on memory. Read Apple's documentation for: (1) ScreenCaptureKit (SCShareableContent, SCContentFilter, SCStreamConfiguration with sourceRect, width, height, pixelFormat, minimumFrameInterval, showsCursor, SCStream, SCStreamOutput) and, on macOS 15 and later, SCRecordingOutput; (2) AVAssetWriter, AVAssetWriterInput and AVAssetWriterInputPixelBufferAdaptor for writing H.264 video to an .mp4 or .mov from sample buffers; (3) screen recording permission (CGPreflightScreenCaptureAccess, CGRequestScreenCaptureAccess) and how an app can send the user to System Settings, Privacy and Security, Screen Recording; (4) NSStatusItem with an NSMenu, an LSUIElement app (no Dock icon), borderless NSPanel windows at a high window level on every screen (.screenSaver or .statusBar level, canJoinAllSpaces, fullScreenAuxiliary), NSCursor.crosshair, and mouse events (mouseDown, mouseDragged, mouseUp, keyDown for Esc). Where a page disagrees with this prompt, follow the page and say what changed. THE MENU (click the menu bar icon) - A small standard menu: "Start Recording" (Command-Shift-R as the key equivalent), a "Recent Recordings" submenu (the last 5 files, click to reveal in Finder), "Open Recordings Folder", "Settings" (a tiny submenu, see below) and "Quit". While a recording is running the menu shows "Stop Recording" instead and the icon changes to a red dot with the elapsed time in the title (00:12, updated every second). The icon is an SF Symbol (record.circle), not a picture file. - Settings submenu: Frame rate (30 or 60, default 30), Show cursor (on by default), Record system sound (off by default; if on, capture audio with ScreenCaptureKit on macOS 13 or later), Save location (default ~/Movies/Region Recorder, choose another with an open panel), Countdown before recording (None, 3 seconds; default 3). Keep them in UserDefaults. SELECTING THE AREA (the important part) 1. "Start Recording" dims every screen with a see-through dark layer (one borderless panel per screen) and turns the cursor into crosshairs. The user drags a rectangle with the mouse. The first mouse press sets one corner, dragging sets the opposite one, and the area inside the rectangle stays bright and clear. 2. While dragging, show the rectangle's size in pixels in a LARGE, high-contrast label (for example 1920 × 1080) in bold white 36-point rounded system font on a solid black rounded box with a thin yellow border, placed just below the rectangle (move it inside the rectangle if it would fall off the screen). The numbers update live with every mouse move, and are rounded to whole pixels and to even numbers (video encoders need even sizes). Also draw the rectangle's border as a 2-point yellow line with a dashed inner white line so it shows on both dark and light backgrounds, and small handles at the corners and edge middles. 3. After the user lets go, the rectangle stays editable: drag inside to move it, drag a handle to resize it, press Esc to cancel everything and return to the normal screen. A small floating control bar appears next to the rectangle (a rounded dark panel, always on top, not part of the recording) with: the five size presets (below), a big red "Record" button, and a "Cancel" button. Return also starts recording and Esc cancels. 4. SIZE PRESETS (a row of five buttons in the control bar, each showing its pixel size, and the one that matches the current rectangle highlighted): 1920×1080 (full HD), 1280×720 (HD), 1080×1920 (vertical video), 1080×1080 (square) and 3840×2160 (4K). Clicking one resizes the rectangle to exactly that many pixels, keeping its centre point (or its top left corner if it would not fit), and shrinks it to fit the screen while keeping the ratio if the screen is too small, saying "Fits to screen" briefly if that happened. Also a small "swap" button that swaps width and height. Remember the last size the user used and offer it as the first suggestion for the next recording. 5. Be careful about points and pixels: the screen works in points (a Retina Mac has 2 pixels per point). The label and the presets mean real pixels of the final video. Convert between them with the screen's backingScaleFactor, set SCStreamConfiguration width and height to the pixel size, and say in the Settings submenu or a tooltip that a 1920×1080 recording is 960×540 points on a Retina screen. If the area spans two screens, limit it to the screen where the drag started. RECORDING - "Record" removes the dimming and the control bar, starts the optional 3-2-1 countdown (large numbers in the middle of the rectangle, not recorded), then starts recording only the rectangle with SCStream and SCContentFilter for that display, excluding this app's own windows. Keep a thin red outline around the area while recording only if it can be left out of the video (an excluded window). A tiny floating "Stop" pill at the top of the screen is not recorded either; the menu bar item and the keyboard shortcut Command-Shift-R also stop. - Write the video with AVAssetWriter as H.264 in an .mp4 (and AAC audio if system sound is on), using the pixel size chosen, the chosen frame rate and a sensible bitrate for that size. Handle timing correctly: use the sample buffer presentation times, start the writer session at the first frame and finish the file properly in finishWriting. On macOS 15 and later you may use SCRecordingOutput if the research shows it is simpler, but still support macOS 13. - "Stop" must really stop: stop the stream, finish the file, release everything, and only then show "Saved" in a small notification (UserNotifications) with a Reveal in Finder action. Never leave a half-written file. If the app quits or the Mac sleeps while recording, finish the file first. Also stop automatically if the disk is nearly full and say so. - Files are named "Screen Recording 2026-10-10 at 14.32.05.mp4" (the real date and time) in the chosen folder. PERMISSIONS AND ERRORS (plain language) - If screen recording permission is missing, the first "Start Recording" explains why in one short alert, asks macOS for it, and offers an "Open System Settings" button. Say that the app may need to be reopened after the permission is granted. - Show clear messages for: the folder cannot be written, the recording failed to start, the stream stopped unexpectedly, and no display found. Include the real error text behind a "Show Details" button. QUALITY - macOS 13, Swift 5 language mode, only Apple frameworks, no packages, no Xcode project or asset catalog. An AppKit app delegate with SwiftUI only where it is easier (the control bar may be SwiftUI hosted in an NSHostingView). LSUIElement set to true. Modular files: AppDelegate (status item and menu), SelectionOverlay (panels, drawing, crosshair, size label, handles), ControlBar, SizePresets, Recorder (ScreenCaptureKit and AVAssetWriter), Preferences, and Notifications. - Nothing slow on the main thread. Keep memory flat during long recordings (no growing arrays of frames). - The code is compiled later on the user's Mac, not here: check every initializer, argument label and optional, with no force-unwraps. Do not fake anything. - In your reply, say in a few sentences what you built, what the lookups changed, and what you could not test: the overlay on several screens, the points to pixels conversion on a Retina screen, the recording file and its timing, system sound, and the permission flow were not run.
What it cost
Every AI run that made this demo, one per line. Model: Claude Sonnet 5.5. Tokens are shown as (in / out). “In” counts everything the model read, including text it had already seen in the session at a reduced price.
| Initial prompt(656k in / 65k out) | 113 credits | |
| = | Total(656k in / 65k out) | 113 credits |
Credits are what a build uses on your plan. This counts AI usage only: hosting and the Mac that compiled it are not included.
Version tree
Every change to this app is a new version. Use any build as a template to start your own copy from it; forks that their makers shared appear as branches.
Version 1.0Oct 11, 2026
Build a native Mac menu bar app called Instant Screen Recorder: a simple screen recorder that lives only in the menu bar. Click the icon, choose "Start Recording", drag a rectangle on the screen, press Record, and later press Stop. No Dock icon, no main window, nothing else to learn. RESEARCH FIRST (use WebSearch and WebFetch before you write code) Do not rely on memory. Read Apple's documentation for: (1) ScreenCaptureKit (SCShareableContent, SCContentFilter, SCStreamConfiguration with sourceRect, width, height, pixelFormat, minimumFrameInterval, showsCursor, SCStream, SCStreamOutput) and, on macOS 15 and later, SCRecordingOutput; (2) AVAssetWriter, AVAssetWriterInput and AVAssetWriterInputPixelBufferAdaptor for writing H.264 video to an .mp4 or .mov from sample buffers; (3) screen recording permission (CGPreflightScreenCaptureAccess, CGRequestScreenCaptureAccess) and how an app can send the user to System Settings, Privacy and Security, Screen Recording; (4) NSStatusItem with an NSMenu, an LSUIElement app (no Dock icon), borderless NSPanel windows at a high window level on every screen (.screenSaver or .statusBar level, canJoinAllSpaces, fullScreenAuxiliary), NSCursor.crosshair, and mouse events (mouseDown, mouseDragged, mouseUp, keyDown for Esc). Where a page disagrees with this prompt, follow the page and say what changed. THE MENU (click the menu bar icon) - A small standard menu: "Start Recording" (Command-Shift-R as the key equivalent), a "Recent Recordings" submenu (the last 5 files, click to reveal in Finder), "Open Recordings Folder", "Settings" (a tiny submenu, see below) and "Quit". While a recording is running the menu shows "Stop Recording" instead and the icon changes to a red dot with the elapsed time in the title (00:12, updated every second). The icon is an SF Symbol (record.circle), not a picture file. - Settings submenu: Frame rate (30 or 60, default 30), Show cursor (on by default), Record system sound (off by default; if on, capture audio with ScreenCaptureKit on macOS 13 or later), Save location (default ~/Movies/Region Recorder, choose another with an open panel), Countdown before recording (None, 3 seconds; default 3). Keep them in UserDefaults. SELECTING THE AREA (the important part) 1. "Start Recording" dims every screen with a see-through dark layer (one borderless panel per screen) and turns the cursor into crosshairs. The user drags a rectangle with the mouse. The first mouse press sets one corner, dragging sets the opposite one, and the area inside the rectangle stays bright and clear. 2. While dragging, show the rectangle's size in pixels in a LARGE, high-contrast label (for example 1920 × 1080) in bold white 36-point rounded system font on a solid black rounded box with a thin yellow border, placed just below the rectangle (move it inside the rectangle if it would fall off the screen). The numbers update live with every mouse move, and are rounded to whole pixels and to even numbers (video encoders need even sizes). Also draw the rectangle's border as a 2-point yellow line with a dashed inner white line so it shows on both dark and light backgrounds, and small handles at the corners and edge middles. 3. After the user lets go, the rectangle stays editable: drag inside to move it, drag a handle to resize it, press Esc to cancel everything and return to the normal screen. A small floating control bar appears next to the rectangle (a rounded dark panel, always on top, not part of the recording) with: the five size presets (below), a big red "Record" button, and a "Cancel" button. Return also starts recording and Esc cancels. 4. SIZE PRESETS (a row of five buttons in the control bar, each showing its pixel size, and the one that matches the current rectangle highlighted): 1920×1080 (full HD), 1280×720 (HD), 1080×1920 (vertical video), 1080×1080 (square) and 3840×2160 (4K). Clicking one resizes the rectangle to exactly that many pixels, keeping its centre point (or its top left corner if it would not fit), and shrinks it to fit the screen while keeping the ratio if the screen is too small, saying "Fits to screen" briefly if that happened. Also a small "swap" button that swaps width and height. Remember the last size the user used and offer it as the first suggestion for the next recording. 5. Be careful about points and pixels: the screen works in points (a Retina Mac has 2 pixels per point). The label and the presets mean real pixels of the final video. Convert between them with the screen's backingScaleFactor, set SCStreamConfiguration width and height to the pixel size, and say in the Settings submenu or a tooltip that a 1920×1080 recording is 960×540 points on a Retina screen. If the area spans two screens, limit it to the screen where the drag started. RECORDING - "Record" removes the dimming and the control bar, starts the optional 3-2-1 countdown (large numbers in the middle of the rectangle, not recorded), then starts recording only the rectangle with SCStream and SCContentFilter for that display, excluding this app's own windows. Keep a thin red outline around the area while recording only if it can be left out of the video (an excluded window). A tiny floating "Stop" pill at the top of the screen is not recorded either; the menu bar item and the keyboard shortcut Command-Shift-R also stop. - Write the video with AVAssetWriter as H.264 in an .mp4 (and AAC audio if system sound is on), using the pixel size chosen, the chosen frame rate and a sensible bitrate for that size. Handle timing correctly: use the sample buffer presentation times, start the writer session at the first frame and finish the file properly in finishWriting. On macOS 15 and later you may use SCRecordingOutput if the research shows it is simpler, but still support macOS 13. - "Stop" must really stop: stop the stream, finish the file, release everything, and only then show "Saved" in a small notification (UserNotifications) with a Reveal in Finder action. Never leave a half-written file. If the app quits or the Mac sleeps while recording, finish the file first. Also stop automatically if the disk is nearly full and say so. - Files are named "Screen Recording 2026-10-10 at 14.32.05.mp4" (the real date and time) in the chosen folder. PERMISSIONS AND ERRORS (plain language) - If screen recording permission is missing, the first "Start Recording" explains why in one short alert, asks macOS for it, and offers an "Open System Settings" button. Say that the app may need to be reopened after the permission is granted. - Show clear messages for: the folder cannot be written, the recording failed to start, the stream stopped unexpectedly, and no display found. Include the real error text behind a "Show Details" button. QUALITY - macOS 13, Swift 5 language mode, only Apple frameworks, no packages, no Xcode project or asset catalog. An AppKit app delegate with SwiftUI only where it is easier (the control bar may be SwiftUI hosted in an NSHostingView). LSUIElement set to true. Modular files: AppDelegate (status item and menu), SelectionOverlay (panels, drawing, crosshair, size label, handles), ControlBar, SizePresets, Recorder (ScreenCaptureKit and AVAssetWriter), Preferences, and Notifications. - Nothing slow on the main thread. Keep memory flat during long recordings (no growing arrays of frames). - The code is compiled later on the user's Mac, not here: check every initializer, argument label and optional, with no force-unwraps. Do not fake anything. - In your reply, say in a few sentences what you built, what the lookups changed, and what you could not test: the overlay on several screens, the points to pixels conversion on a Retina screen, the recording file and its timing, system sound, and the permission flow were not run.
A menu bar screen recorder: drag a rectangle, press Record, press Stop.
Opening it for the first time
- Open the .dmg and drag Instant Screen Recorder onto the Applications folder.
- Open it from Applications. macOS may say it can’t check the app for malicious software. Click Done.
- Open System Settings → Privacy & Security and click Open Anyway. This is needed once. Why this happens. To share an app without the warning, see how to notarize it.
You might also like
 Get
GetPlayTube
Paste a video link and watch it in a clean player, with no ads.
 Get
GetAdMute
Listens to your Mac's audio and mutes the ads, then brings the sound back.
 Get
GetToob-Downer
Paste a video link and save the video to your Mac, with a queue to keep track.
 Get
GetAgent Swarm
Send one task to Claude, Gemini and Hermes at once.